That is a question that we often hear. Mostly by very intelligent people but with some lacking technological knowledge. System administrators in your company will probably know what to do, but what if you want to do this yourself, or when there is no system administrator around? Let me guide you.
Presentation layer and Data layer
You can’t use the television or computer screen that is running your dedicated slide show. That information screen is busy with displaying your presentation. You can’t open your Excel file with the data while you are displaying. At an airport, you don’t see someone opening the Excel file with flight information to update the screen content. No, that is done via another mechanism.
Typically you store the information or your data files on a shared network, so that you and your colleagues can open the file for editing, while DataPoint is keeping your dynamic information screen up-to-date. Typically this is saved on a file server. But you could by-pass the file server, or set up a small sharing location for your displaying purposes.
By doing so, you separate the presentation layer and the data layer. The presentation layer is using a PowerPoint presentation as slide show on a dedicated computer with television or computer screen. The second layer, the data layer, is just storing the data file at a shared location so that everyone can access it.
Where to store the data files?
Let’s sum up the possible scenarios. Let’s call the computer that is running the PowerPoint presentation or slide show, computer A. This computer has a television screen or computer screen connected to display the data results on your information screen.
Next to that computer, you have your own computer, computer B. There you open the Excel file or database to edit the information that is displayed on computer A.
Optionally, you have computer C that is already your company’s file server. But this is optional.
A typical minimal configuration exists of computer A and B. To make it simple, you can choose to place the data file on whatever computer; computer A or computer B or computer C, as long as the file or location is shared.
Personally, I would put the file on computer A or C, but never on B. Let me explain. The problem is unavailability. When you have your data file on the file server, or computer C, and the system is rebooting, then this causes errors (not neccesicarly visible by the viewers) when the file cannot be accessed. This is more likely to happen to your work computer (computer B). Computer B could be a laptop that you take home for work. At that time, computer A will not be able to connect to computer B for data refreshes, while you are driving home with the data.
So that leaves us with the best option. Put the network share or data file on computer A where you most need it. Of course, this option is only interesting when you only have 1 display computer (computer A type). When you have multiple computers displaying the information from the same data file, then maybe it will be better to store the file on computer C. Or choose one of the computer A’s to store the data.
How to set up a network share
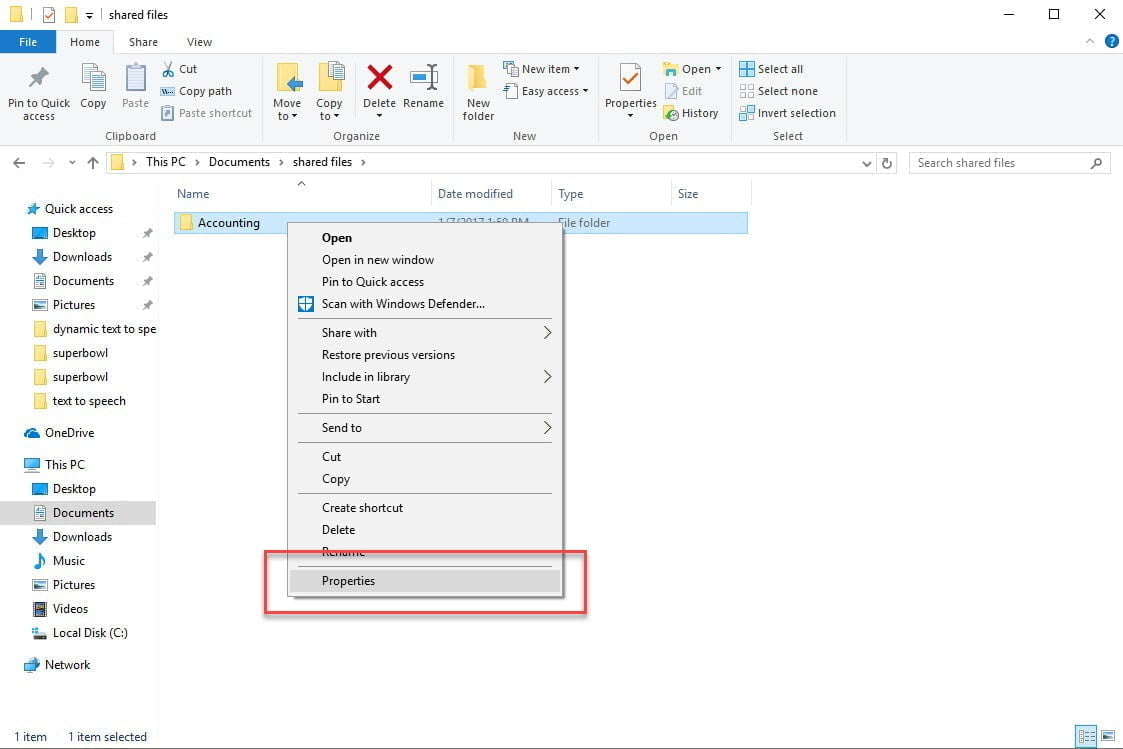
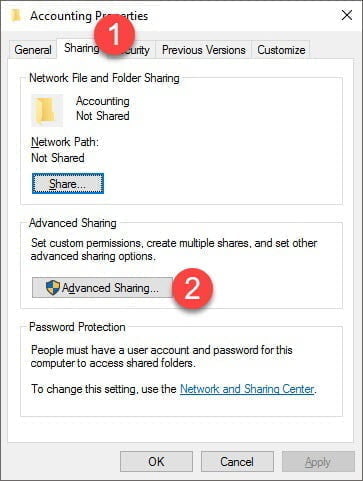
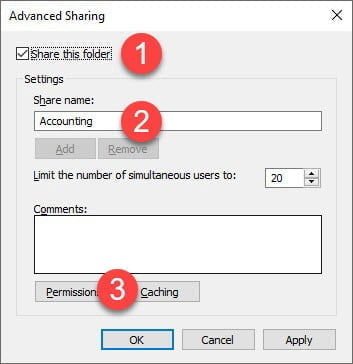
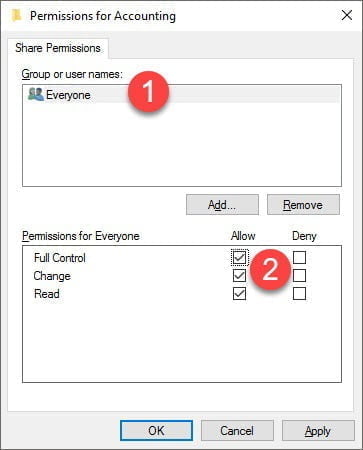
Follow these instructions if you want to set up a new network share on computer A or B. You will not have to create a network share when you put your data file on an existing network share or file server like computer C. In that case, you can use the existing network share directly.
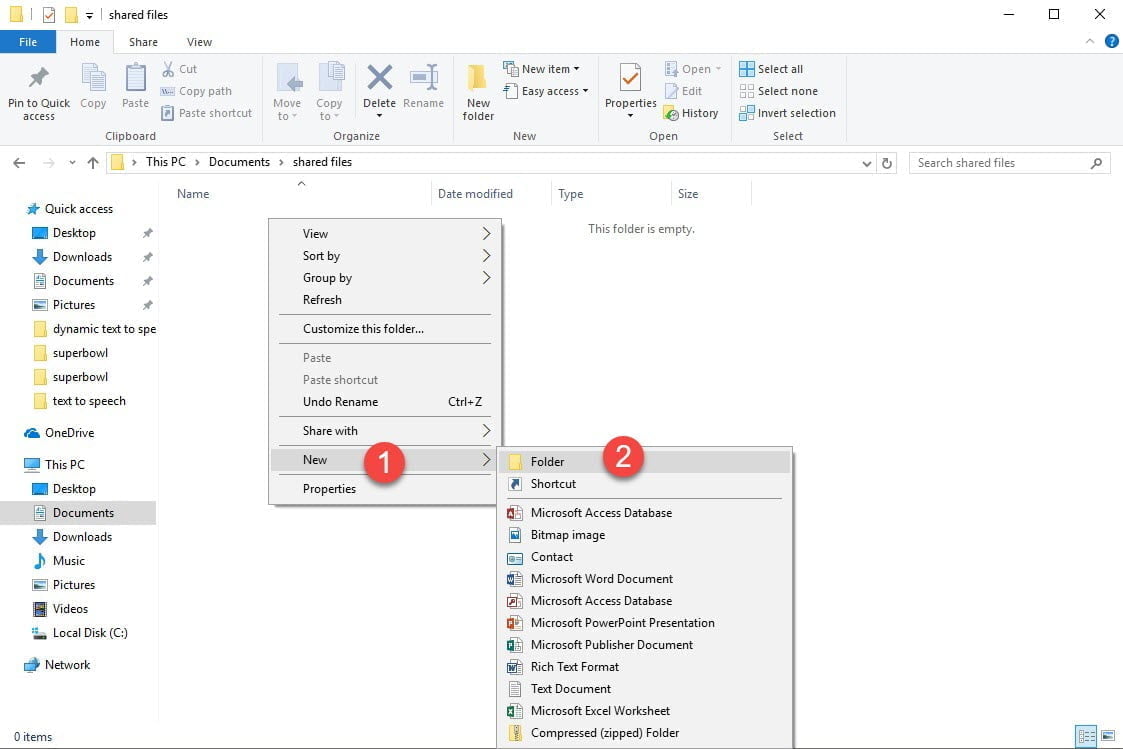
Open a File Explorer and navigate to the folder where you want to have your shared folders. Right click at the pane and choose New, Folder from the popup menu.
How access a network share?
UNC paths
One option to address a network share is to use a UNC path or Uniform Naming Convention. A UNC path identifies a network share and has 4 possible parts in the path. The computer name, the share name and the optional path, and finally the filename itself. It could look like:
\\computername\sharename\optionalpath\filename.extension
A possible UNC path could be:
\\FSRV\Accounting\2017\orders.xlsx
Where FSRV is the computer name of the computer that has the network share. Accounting is the name of the network share. 2017 is the optional path and orders.xlsx is the actually file name.
To open a file from a network share, just browse or enter the UNC path in the file explorer.
Mapped drives
When you access UNC paths frequently like for example from a file server, then you are better of to use a mapped drive or drive letter that points to your UNC path. So you can map e.g. your T-drive to \\FSRV\Accounting. This mapped drive will show up next to your C- and D-drive in your file explorer.
To open a file from a mapped drive, just browse to the mapped drive in your file explorer or enter the mapped drive like T:\ in your file explorer.
How to use a network share in DataPoint?
Use DataPoint to set up data links in your PowerPoint presentation. Click to open the DataPoint tab and click the List button of the Connections group.

