 A lot.
Microsoft’s PowerPoint is no doubt one of the most versatile and most used Office applications. From helping people organize charts, statistics, data and information, to helping presenters pass information to an audience in the simplest and most visually appealing way, everybody at one point will make use of the PowerPoint.
There are more than 500 million PowerPoint users with over 300 million presentations created per day, using the application.
However, from 1984 (when the first application was rolled out) until now, a lot has changed about the features—and target—of the app. For one, it was initially made for “managers, professionals, knowledge workers, and salespeople”. Now the application is for everybody.
And while the basic functions of organizing presentations are still in use, a lot of features have been improved upon.
The previous version was Office 2016 and next to this traditional version, Microsoft started with their Office 365 subscription-based version. Regularly, they added new features to the Office 365 edition like the text highlighter, Morph transitions and more. Basically, this new Office 2019 is the sum of Office 2016 plus all the new features of Office 365.
Here are the latest features in PowerPoint 2019:
Enter the text highlighter
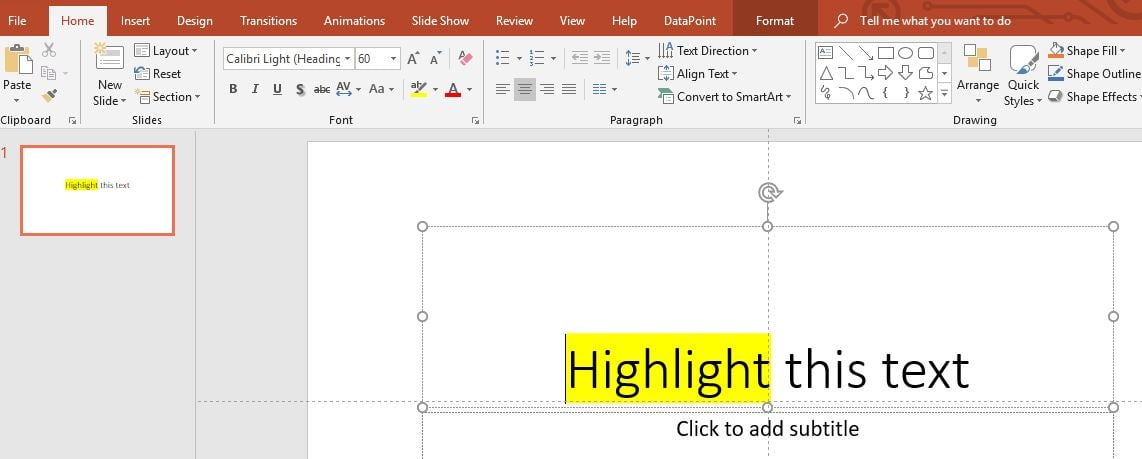
If you have used this feature in Microsoft Word, it is not so different in PowerPoint 2019. Found under the Home tab (and under fonts), the text highlighter allows you to emphasize important texts by changing the color around the text.
Funnel Charts
A powerful way to depict trends, funnel charts can help show how data has increased or decreased across various dependent stages. Generally, they are called funnel charts because the value decrease and the shape look like a funnel.
Tip: if you are an Excel user, this option is also available.
Transition Morph
Transitions are one of the interesting features of PowerPoint. You might be used to effects like Honeycomb, Fade, Zoom, Random, Origami, Gallery and so on. If you are, you will love the newly introduced Morph effect.
Tip: It is placed after the Normal effect and before the Fade effect so that you can locate it easily.
Basically, the morph effect is used to animate or make your slides or objects move as if they have life within them. It can make your objects bigger from the background and you can specify what you want to animate.
To make use of the morph effect, you will need to duplicate the slide you want to morph. Click on the transitions tab and apply the morph to the duplicate slide or object. Afterward, click on the preview to see if you like what you did.
The Zoom
Zooming has always been a great feature to have around. Not only for PowerPoint presentations but for everything else.
The new Zoom effect in PowerPoint 2019 is another great way to emphasize presentations. You can see more than one—or all—of your slides at a glance and choose which one you want to discuss or present.
With the Zoom for PowerPoint 2019, you can jump from a slide or section to another slide or section of your presentation.
The zoom tab has three commands which you can choose from to bring out various interesting effects.
- The summary zoom
- The Section zoom
- The Slide zoom
Remove Image Background… easily
With this new version of PowerPoint, you can easily remove the background of an image. The auto-detect feature removes the need to draw around the shape you want to keep in the foreground. More still, you can draw with pencil in free-form instead of using straight lines only—a limitation found in previous versions.
Insert Icons and 3D models
If you have 3D models you want to insert, click on the insert tab and on 3D models to choose “from a file”.
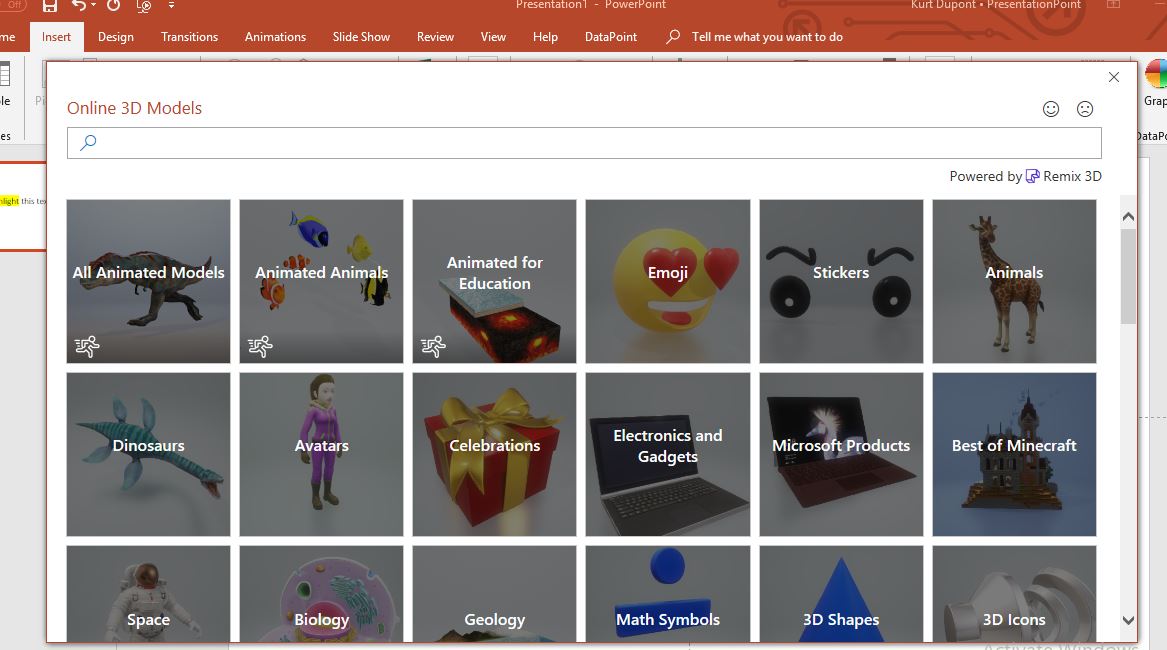
If you don’t have 3D models available, but you intend to insert one, you can choose “from online sources”. As part of the update, there is a large online library called Remix 3D, on which you can search through for different models.
After you insert, you have options to manipulate the image. You can:
- Tilt the image in any direction or position
- Make the image smaller or bigger
- Rotate the image
- Align the model on the page or slide
- Pan and zoom the model to make it fit within the frame
- Use the morph transition to rotate or zoom the 3D model
You can also insert Scalable Vector Graphics or SVG images. You have options to edit the color and texture; add effects like shadows, glow or reflection; and align, rotate, crop or zoom the image.
Interestingly, you can also covert the SVG image into shape and edit the parts independently. Simply right-click the SVG image and click on convert to shape.
Add an Online Video
Mac users can add a live or online video to their slides without leaving the presentation. Here is how:
- Go to YouTube or Vimeo
- Look for the video you want to make use of.
- Right under the video frame, click on Share, and click on Embed. (If you don’t click on Embed, you will end up copying the wrong code)
- Copy the iFrame embed code. (The code MUST not begin with “https”. It does, click on Embed again)
- Go back to your PowerPoint presentation.
- Click the slide in which you want to add the video.
- Click on the Insert tab and on “Video”. Afterward, click on “Online Video”.
- In the “From a Video Embed Code box”, paste the embed code you copied, and then click the arrow.
- You will see a video rectangle that you can move and resize to suit your needs. Preview the video.
You can also search for the YouTube video by name and insert into your slides.
Also, you can trim or cut out parts of a video that you don’t want. This option is available only for videos that you have inserted from your computer and is available for both Windows and Mac users, although Mac users need to be on Office 365.
You can also trim audio files and discard parts that you do not need.
Convert to High Quality Videos
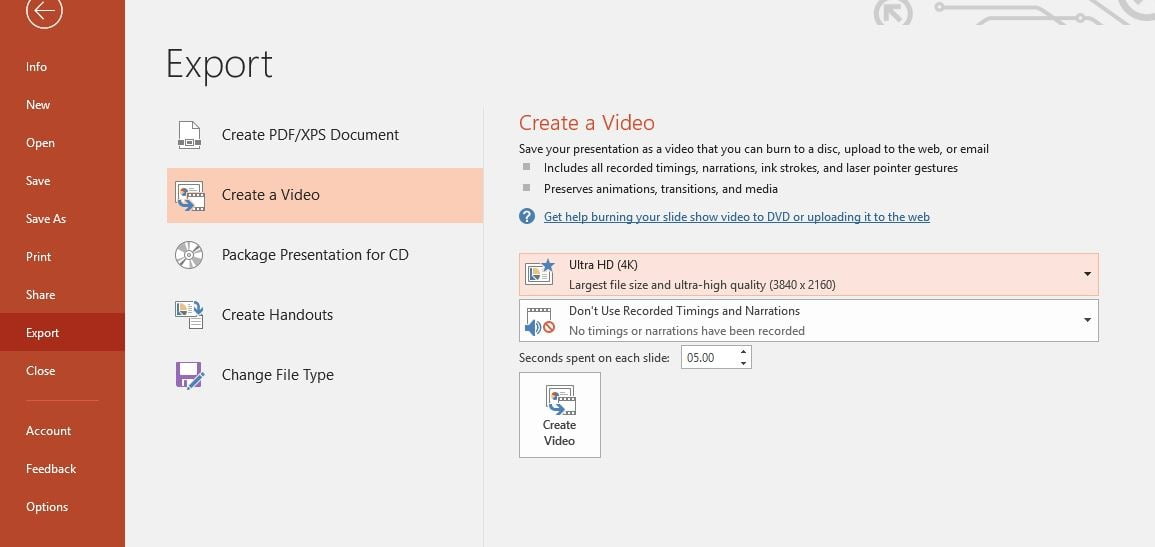
After saving your presentation in .pptx, you can export the file and convert it into a video format. The 2016 PowerPoint version allows you to do this. However, in PowerPoint 2019, you can export your video as an Ultra High Definition (HD) or 4K format which you can display on large screens.
You can also save your presentation as a PowerPoint show (.ppsx), such that when people open the file, it displays in full-screen and presentation mode. They begin to see your presentation immediately.
Digital Control
If you have a Surface Pen 4 or any digital pen that supports Bluetooth connectivity, you can control your slides and advance them.


Some nice features!
I love it!
it fantastic
Am loving the “new” Microsoft.
Thew new functionality in PowerPoint is excellent!
How about track changes. You know, something that would be useful to virtually every user?
wow amazing
Pretty nice article. I’m still guessing whether to stay with my office 2016 or get the new 2019. Yes, your article helped but I’m still not sure.
Thanks
Rahul
Admin Techtuza Blogger
Thanks for the feedback. It is absutely not our intention to motivate you to upgrade. Just to inform… 🙂
its so nice
Not able to find the design ideas option in MS Powerpoint 2019
That sounds normal Arnab. PowerPoint 2019 does not have that. Only the Office 365 version has this capability.
Is video recording built in?
How much is the monthly subscription?
Video recording is indeed included. No idea about pricing. We are not selling this.
The features are really wow !
What about inbuilt camera in PowerPoint 2019? Is it there? I am unable to find it.
Hi Arif, no that I know. You can add your webcam and IP cameras via our VideoPoint plugin. Check out https://presentationpoint.com/software/videopoint/
How about something truly useful, like inserting real-time document properties (aka “fields”) the way you can in Word?
Do you mean that mail merging functionality in Word, where you can mail merge your data into multiple pages?
We have that with our datapoint plugin. With that, you can connect data, and mail merge data into slides. Check out https://presentationpoint.com/blog/mail-merged-powerpoint-presentations-4-types/
very useful document and very special features here . best of luck .